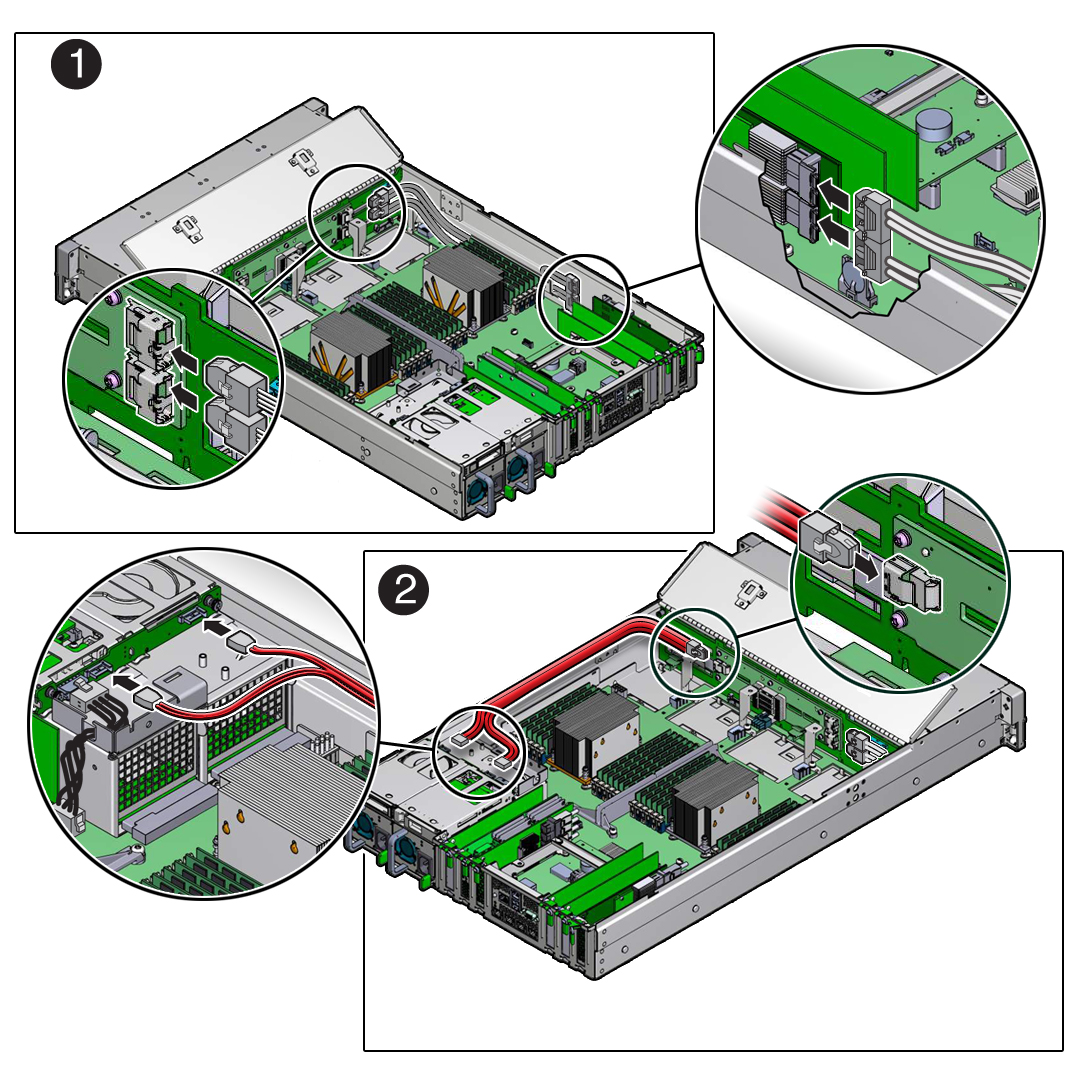
Install SAS Storage Drive Cables
-
Install SAS storage drive cables.
-
Install the SAS cables between the front storage drive backplane
and the Oracle Storage 12 Gb/s SAS PCIe RAID HBA card in PCIe slot 6
[1].
Route the SAS cable bundle through the chassis mid-wall and along the left side of the chassis. To ensure that the SAS cable bundle does not interfere with the air baffle, install the SAS cable bundle under the super capacitor cable for the Oracle Storage 12 Gb/s SAS PCIe RAID HBA card along the left side of the chassis.
Note - The following figure shows SAS cables being installed in the twenty-four drive system configuration. If you are installing SAS cables in an eight-drive system configuration, your front disk backplane SAS connector locations will be different. In addition, the chassis mid-wall is removed in the illustration to clearly show the SAS cable connections.
-
(Optional) Install the cables between the front storage drive
backplane and the rear storage drive backplane [2].
Note - SAS cable connectors do not fit through the right-side chassis mid-wall. If you are installing SAS cables between the rear storage drive backplane and front storage drive backplane, you first must remove the chassis mid-wall. For instructions, see Step 3 in Install the Motherboard Assembly.Route the SAS cable bundle through the chassis mid-wall and along the right side of the chassis.
-
Install the SAS cables between the front storage drive backplane
and the Oracle Storage 12 Gb/s SAS PCIe RAID HBA card in PCIe slot 6
[1].
-
Reconnect the SAS cables.
-
To reconnect the SAS cables between the front storage drive
backplane and the Oracle Storage 12 Gb/s SAS PCIe RAID HBA card,
plug each cable into its SAS connector until you hear an audible
click [1].
See also Install the Oracle Storage 12 Gb/s SAS PCIe RAID HBA Card.
Use the following table to ensure proper SAS cable connections:
System Disk ConfigurationDisk Backplane PortsHBA PortCable Part NumberEight storage drivesShorter length cable for drives 0-3J5A17076125Eight storage drivesLonger length cable for drives 4-7J5A17076125Twelve storage drivesJ302 (Upper)J5A17091185Twelve storage drivesJ301 (Lower)J5A17091185Twenty-four storage drivesJ3202 (Upper)J5A17091185Twenty-four storage drivesJ3201 (Lower)J5A17091185 -
(Optional) To reconnect the SAS cables between the front storage
drive backplane and the rear storage drive backplane, plug each
cable into its SAS connector until you hear an audible click
[2].
In twelve and twenty-four drive systems, attach the SAS cable to connector (J300) on the front storage drive backplane and to SAS connectors (RHDD0 and RHDD1) on the rear storage drive backplane.
Note - Cable part number 7064129 is required for SAS connections between the front storage drive backplane and rear storage drive backplane.
-
To reconnect the SAS cables between the front storage drive
backplane and the Oracle Storage 12 Gb/s SAS PCIe RAID HBA card,
plug each cable into its SAS connector until you hear an audible
click [1].
-
Return the server to operation.
- Depending on your server's storage drive configuration, do one of the following:
- Lower the air baffle to the installed position.
-
Install the fan modules and close the fan assembly door.
See Install a Fan Module.
- Install the server top cover.
- Return the server to the normal rack position.
-
Reconnect the power cords to the power supplies, and power on the
server.
See Reconnect Power and Data Cables and Power On the Server. Verify that the power supply AC OK LED is lit.