JavaScript is required to for searching.
Skip Navigation Links
Exit Print View
SPARC M5-32 and M6-32 Servers HTML Collection
search filter icon
search icon

Document Information

Using This Documentation

Product Notes

Related Documentation

Feedback

Access to Oracle Support

Installation

Understanding the Server

Installation Task Overview

Server Overview

System Status LEDs

Front Components

Rear Components

Understanding the Hardware Architecture

Understanding the Firmware and Software Environment

Preparing the Site

Site Preparation Checklist

General Installation Site Guidelines

Reviewing the Physical Specifications

Reviewing the Power Requirements

Preparing for Cooling

Preparing the Unloading Route and Unpacking Area

Planning Network Addresses

Preparing for Installation

Handling Precautions

ESD Precautions

Oracle Safety Information

Equipment Needed for Installation

Attach an Antistatic Wrist Strap

Installing the Server

Confirm the Site Preparation

Receive the Server

Unpack the Server

Moving the Server

Stabilizing the Server

Optional Component Installation

Connecting the Front SP Cables

Connect the SP Cables

Securing the SP Cables

Connecting the Rear Power Cords and Data Cables

Rear Cable Routing Options

Maximum Cable Connections

Cable Management Devices

Prepare the Cable Routing Brackets

Connect the Power Cords

Secure the Power Cords

Connect the EMS Network Cables

Connect Other Data Cables

Managing Data Cables

Powering On the Server for the First Time

Installed Software

Inspect the Power Cords

Dual-Redundant SPs

Connect Terminals or Emulators to the SP SER MGT Ports

Switch On the Facility Circuit Breakers

Log In to the Active SP

Set Oracle ILOM Network Addresses

Set the Altitude of the Server

Power On the Server

Oracle Solaris OS Configuration Parameters

Additional Software Configuration and Testing

Administration

Understanding the System Architecture

Architectural Overview

PDomain Types

Understanding PCIe Device Root Complexes

Understanding EMS SAS Paths to the Internal Drives

Understanding Internal Drive Device Paths

Understanding Network Port Device Paths

Understanding Configuration Guidelines

Understanding System Administration Resources

Oracle ILOM Overview

Understanding Platform-Specific Oracle ILOM Features

Oracle Solaris OS Overview

OpenBoot Overview

Oracle VM Server for SPARC Overview

Multipathing Software Overview

Oracle ILOM Remote System Console Plus Overview

Oracle Hardware Management Pack Overview

Oracle Enterprise Manager Ops Center

Time Synchronization and NTP Service

SNMP Service

Multi-Domain Extensions to ILOM MIBs

Active Directory

LDAP/SSL

Accessing the Server

Establish a Network Management Connection to Oracle ILOM

Logging In to Oracle ILOM

Log Out of Oracle ILOM

Switch Between the Oracle ILOM CLI and the System Console on a Host

Accessing the ok Prompt

Redirecting KVMS Devices

Controlling the Server, Domains, and Devices

Controlling the Power State

Resetting the Server, SP, or Domains

Managing the Server's Boot Behavior

Booting and Shutting Down the OS

Configuring Oracle ILOM User Accounts and Roles

Managing User Accounts

Managing User Authentication

Configuring the SP Network

Network Resources Overview

Record Network Parameter Values

Configure SP Network Settings

Viewing the Network Configuration

Administering SPs

Managing IP Addresses

Display the MAC Address

Configuring Domain Components

Configuring Physical Domains

Administering DCUs

Administering CMUs, CMPs, and DIMMs

Administering IOUs and PCIe Device Root Complexes

Identifying Domain-Level Commands

Monitoring the Server

Locating the Server

Obtain the Server Serial Number

Viewing Server and Component Information

Monitoring Faults

Updating the Firmware

Display the Firmware Version

Firmware Update Overview

Update the Firmware

XSCF and Oracle ILOM Command Comparison

Identifying SP Configuration and Administration Commands

Identifying Domain Administration Commands

Service

Identifying Components

Identifying Front Components

Identifying Rear Components

Side Panels

Identifying Internal Components

Understanding Scalability

Understanding Cooling Zones

Component Service Task Reference

Detecting and Managing Faults

Diagnostic Overview

Managing Faults

Interpreting Log Files and System Messages

Configuring POST

Interpreting LEDs

Preparing for Service

Service Sequence

Safety Information

Tools for Service

Torque Reference

Filler Panels

Find the Server Serial Number

Locate the Component

Power Off a PDomain

Removing Power From the Server

Servicing Cabinet Doors

Remove the Door

Install the Door

Servicing Side Panels

Remove Side Panels

Install Side Panels

Servicing Trim Panels and the Kick Plate

Trim Panel Service Preparation

Remove the Trim Panels

Install Trim Panels

Remove the Kick Plate

Install the Kick Plate

Servicing Power Supplies

Power Supply Configuration

Power Supply LEDs

Remove a Power Supply

Install a Power Supply

Servicing PSDBs

PSDB LEDs

Remove a PSDB

Install a PSDB

Servicing Fan Modules

Fan Module Configuration

Fan Module LEDs

Remove a Fan Module

Install a Fan Module

Servicing SSBs

SSB Configuration

SSB LEDs

Remove an SSB

Install an SSB

Servicing Clock Boards

Clock Board Configuration

Clock Board LEDs

Display the Clock Board Type

Remove a Clock Board

Install a Clock Board

Servicing Service Processors

Service Processor LEDs

Check a Service Processor Battery

Remove a Service Processor

Replace a Service Processor Battery

Install a Service Processor

Servicing I/O Switch Boards

I/O Switch Board Configuration

I/O Switch Board LEDs

Remove an I/O Switch Board

Install an I/O Switch Board

Servicing Cable Management Assemblies

Remove a Cable Management Assembly

Install a Cable Management Assembly

Servicing I/O Cards

Understanding I/O Card Slot Configuration

Understanding I/O Card Slot Device Paths and FRU Paths

Sun Flash Accelerator F40 and F80 PCIe Cards

PCIe Hot-Plug Carrier LEDs

Locate an I/O Card in the Server

Locate a Faulty I/O Card

Prepare an I/O Card For Removal

Remove an I/O Card From the Server

Remove an I/O Card From a Carrier

Install an I/O Card in a Carrier

Install an I/O Card in the Server

Remove a Filler Panel From the Server

Remove a Filler Panel From a Carrier

Install a Filler Panel in a Carrier

Install a Filler Panel in the Server

Verify an I/O Card

Relocate a Sun Flash Accelerator F40 PCIe Card

Servicing EMSs

Understanding EMS Configurations

EMS General Status LEDs

EMS Network Port LEDs

Determine Hard Drive Cage and EMS Part Numbers

Remove an EMS

Install an EMS

Servicing HDDs, SSDs, and Drive Filler Panels

Understanding HDD and SSD Slot Configurations

HDD LEDs

SSD LEDs

Locate a Drive

Removing an HDD

Install an HDD

Removing an SSD

Install an SSD

Remove a Drive Filler Panel

Install a Drive Filler Panel

Servicing SPPs

SPP Configuration

SPP LEDs

Check an SPP Battery

Remove an SPP

Replace an SPP Battery

Install an SPP

Servicing CMUs

CMU Configuration

CMU Upgrades in a SPARC M5-32 Server

CMU LEDs

Display General CMU Information

Display the CMU Quantity and Type

Unpacking and Inspecting a CMU

Remove a CMU

Install a CMU

Repack a CMU for Shipping

Remove a CMU Filler Panel

Install a CMU Filler Panel

Servicing DIMMs

Memory Configuration

DIMM FRU Names

Locate a Faulty DIMM

DIMM Fault Remind Button

Remove a DIMM

Install a DIMM

Move DIMMs to a New CMU

Servicing the Front LED Panel

Front LED Panel LEDs

Remove the Front LED Panel

Install the Front LED Panel

Servicing the Front Filler Panel

Remove the Front Filler Panel

Install the Front Filler Panel

Servicing Fan Cages

Fan Cage Configuration

Remove the Upper Fan Cage

Install the Upper Fan Cage

Remove the Lower Fan Cage

Install the Lower Fan Cage

Servicing a Cabled Lower Bus Bar Assembly

Remove a Cabled Lower Bus Bar Assembly

Install a Cabled Lower Bus Bar Assembly

Servicing the Scalability Card Cage

Remove the Scalability Card Cage

Install the Scalability Card Cage

Servicing the Scalability Fans Cable

Remove the Scalability Fans Cable

Install the Scalability Fans Cable

Servicing the Power System Cage

Remove the Power System Cage

Install the Power System Cage

Servicing Bus Bars

Bus Bar Configuration

Prepare to Replace Crown Clips on a Bus Bar

Replace Crown Clips

Return the Server to Operation

Servicing AC Power Cords

AC Power Cord Configuration

Remove an AC Power Cord

Install an AC Power Cord

Servicing AC Input Filters

AC Input Filter Configuration

Remove an AC Input Filter

Install an AC Input Filter

Disconnect AC Input Filters

Reconnect AC Input Filters

Servicing the Rear LED Panel

Rear LED Panel LEDs

Remove the Rear LED Panel

Install the Rear LED Panel

Servicing IOUs

Remove an IOU

Install an IOU

Servicing an I/O Power Cable Assembly

Remove an I/O Power Cable Assembly

Install an I/O Power Cable Assembly

Servicing Hard Drive Cages

Hard Drive Cage Configuration

Remove a Hard Drive Cage

Install a Hard Drive Cage

Servicing the Scalability Assembly

Remove the Scalability Assembly

Install the Scalability Assembly

Servicing the Fan Power Cable

Remove the Fan Power Cable

Install the Fan Power Cable

Servicing the Power System Cage to Scalability Assembly Cable

Remove the Power System Cage to Scalability Assembly Cable

Install the Power System Cage to Scalability Assembly Cable

Servicing the PSDB to Scalability Midplane Cable

Remove the PSDB to Scalability Midplane Cable

Install the PSDB to Scalability Midplane Cable

Servicing the Internal Link to Front LED Panel Cable

Remove the Internal Link Cable for the Front LED Panel

Install the Internal Link Cable for the Front LED Panel

Servicing the Rear LED Panel Cable

Remove the Rear LED Panel Cable

Install the Rear LED Panel Cable

Servicing Midplane Power Cables

Prepare to Remove a Midplane Power Cable

Remove a Midplane Power Cable

Install a Midplane Power Cable

Servicing the I/O Data Cable Assembly

Remove an I/O Data Cable Assembly

Install an I/O Data Cable Assembly

Servicing the Midplane

Inspect the Replacement Kit

Prepare to Remove the Midplane

Remove the Midplane

Install the Midplane

Reassemble the Server

Prepare the Old Midplane for Return

Returning the Server to Operation

Return to Operation Sequence

Reconnect AC Power to the Server

Restart the Server

Reset the Server

Reset Service Processors

Reset a PDomain

Restart a PDomain

Return a Component to Oracle

Glossary

Index

Install the Midplane


Caution

Caution - The midplane weighs 80 pounds and requires two people to move it.


  1. If you haven't already removed the old midplane, see Remove the Midplane.
  2. Use an antistatic wrist strap to protect the equipment from ESD damage.
  3. Prepare the replacement midplane.
    1. Carefully unpack the replacement midplane.

      You will reuse the packing materials in a later step to send the faulty midplane to an Oracle repair depot.


      Caution

      Caution - Do not remove the protective plastic covers from the connectors on the midplane until you are ready to connect a cable connector to a socket.


    2. Stand the midplane vertically on a static‐safe work space.
    3. Attach the handles to the sides of the midplane.
      1. Insert the keyed pins on the handles into the keyholes on the sides of the midplane.
        image:Drawing shows attaching handles to the midplane.
      2. Raise the spring-loaded lock pin, and then align the pin with the corresponding hole in the base of the midplane.
      3. Install the second handle in the same manner.
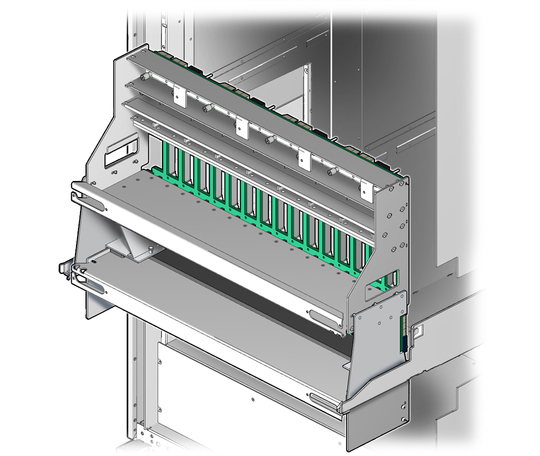
    4. Extend the two server slides fully.
    5. Use the midplane handles to carry the midplane to the slides.
    6. Tilt the top of the midplane slightly away from server to insert the hooked tabs on the handles into the near ends of the slides, and then lower the midplane so the rear tabs on the handles drop into the slides.
      image:Figure shows midplane and handles on slides out of the chassis.
    7. Remove the plastic covers from the connectors on the midplane.

      Do not discard the plastic covers. You will return them to Oracle.

  4. Attach the replacement midplane to the server:
    1. Push evenly on both handles to slowly slide the midplane into the server.

      Caution

      Caution - Because of the weight of the midplane, it is easy to accidentally damage the connectors. Push the midplane slowly until the guide pins and the connectors are engaged.


    2. Loosely install the captive T20 Torx screws on the front of the midplane.

      One type of midplane has 13 front screws.
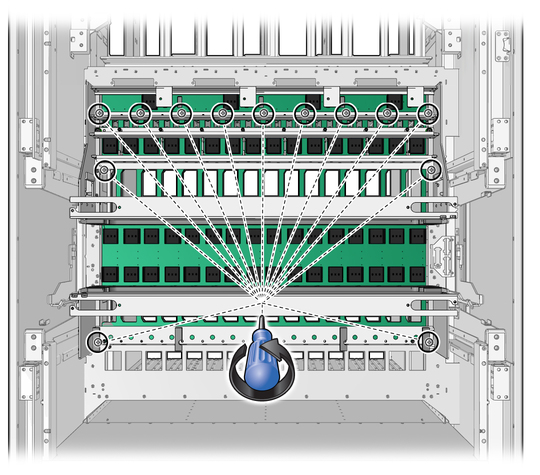

      image:Figure shows 13 screws on the front of the midplane.

      A second type of midplane has 21 front screws.
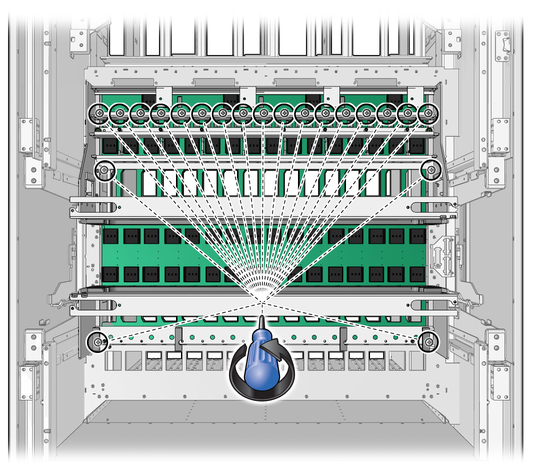

      image:Figure shows 21 screws on the front of the midplane.
    3. At the rear of the server, install and tighten four T20 Torx screws through the CMU cage to the rear of the midplane.

      Use the torque screwdriver that is included with the replacement midplane. Set the torque screwdriver to 15 in-lb.
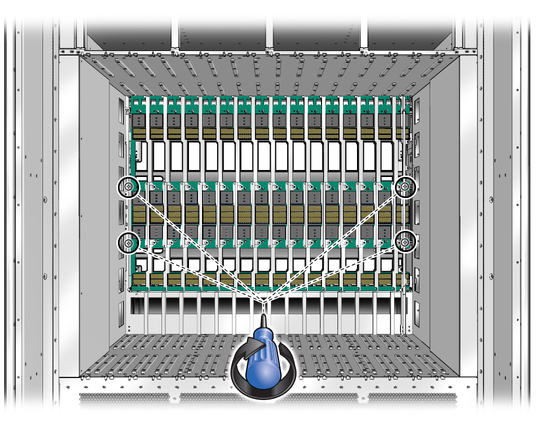

      image:Figure shows screws in CMU cage.
    4. Return to the front of the server and tighten the front midplane screws.
      1. Follow the numbered sequence shown in the illustration to tighten the top row of screws.

        Start in the middle of the top row, and then alternate right and left until all screws are tightened.

        Use the torque screwdriver to tighten the screws to 15 in-lb.

        The 13-screw midplane has nine screws in the top row.
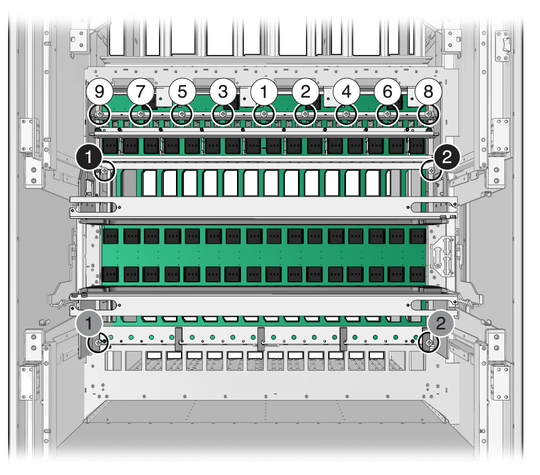

        image:Figure shows the order for tightening the front screws on the 13-screw midplane.

        The 21-screw midplane has 17 screws in the top row.
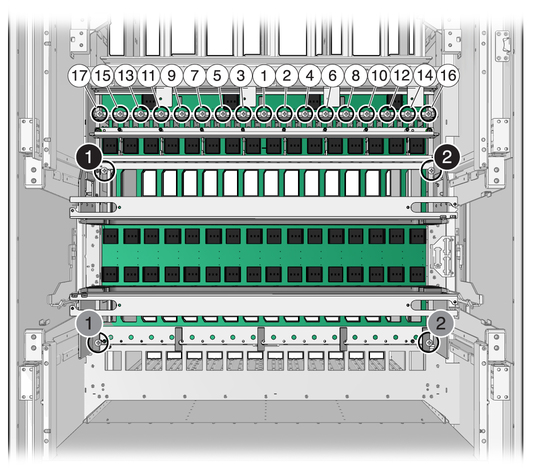

        image:Figure shows the order for tightening the front screws on the 21-screw midplane
      2. Tighten the remaining four screws in any order.

        Use the torque screwdriver to tighten the screws to 15 in-lb.

    5. Adjust two support brackets inside the cabinet.

      Note - This step applies only to cabinets with the 21-screw midplane. Cabinets with the 13-screw midplane do not have support brackets.
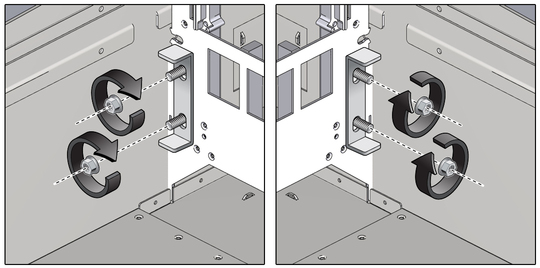
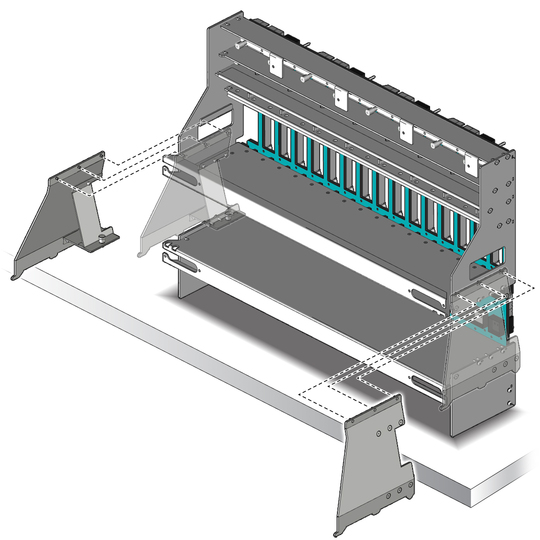
      1. Raise the brackets to press against the bottom of the midplane.
      2. Tighten the 10‐mm M6 nuts to approximately 15 in-lb (1.7 Nm).

      image:Loosening the support brackets.
    6. Remove the handles from the sides of the midplane.
      1. Raise the spring-loaded lock pin on a handle.
        image:Drawing shows attaching handles to the midplane.
      2. Raise the handle slightly to free the keyed pins at the fop from the keyholes on the midplane.
      3. Tilt the handle to remove the hooked tab from the slot in the slide, and then set the handle aside.
      4. Repeat Step i through Step iii to remove the second handle.
    7. Reattach cables to the midplane:
      1. Install the cabled lower bus bar assemblies.

        See Install a Cabled Lower Bus Bar Assembly.

      2. Install the I/O data cables.

        See Install an I/O Data Cable Assembly.

      3. Install the left and right scalability card cage cables on the upper shelf of the midplane.
  5. Reattach the connectors and brackets to the sides of the cabinet.

    Tighten the screws to 15 in-lb.

  6. Reassemble the server.

    See Reassemble the Server.

Related Information