
Cloning a virtual machine means making a copy of it, so that you can create multiple virtual machines or templates from the original. Moving a virtual machine means moving the virtual machine configuration file to another storage repository.
The virtual machine cloning procedure below uses the same dialog box to clone a virtual machine and a template.
A clone can also be performed using two other file copy methods: sparse copy, and non-sparse copy. These two cloning methods can be used when cloning from and to different repositories, and when the storage used for the storage repository uses a generic Oracle VM Storage Connect plug-in. These cloning methods are slower than thin cloning, but more versatile.
To create a clone of a virtual machine or template:
Select the virtual machine or template to clone and display the Clone or Move dialog box. You display this dialog box from different locations, depending on whether you are cloning a virtual machine or a template.
Virtual Machine: Click the Servers and VMs tab. Select the server pool on which the virtual machine resides in the navigation tree. Select Virtual Machines from the Perspective drop-down list. Select the virtual machine to clone in the management pane, and click Clone or Move
 .
.
Virtual Machine Template: Click the Repositories tab. In the navigation tree, select the repository in which the template resides, then VM Templates. Select the template in the management pane and click Clone or Move Template...
.
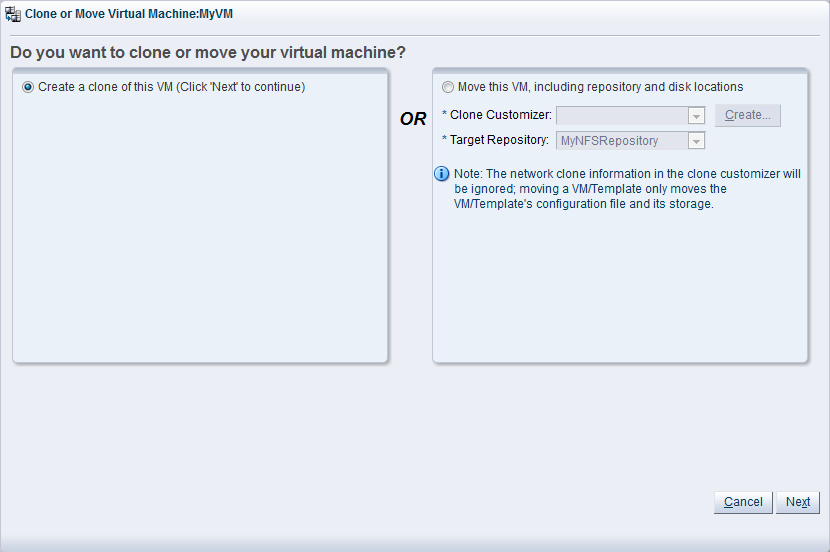
The Clone or Move dialog box is displayed.
Select the Create a clone of this (VM or Template) option. Click Next.
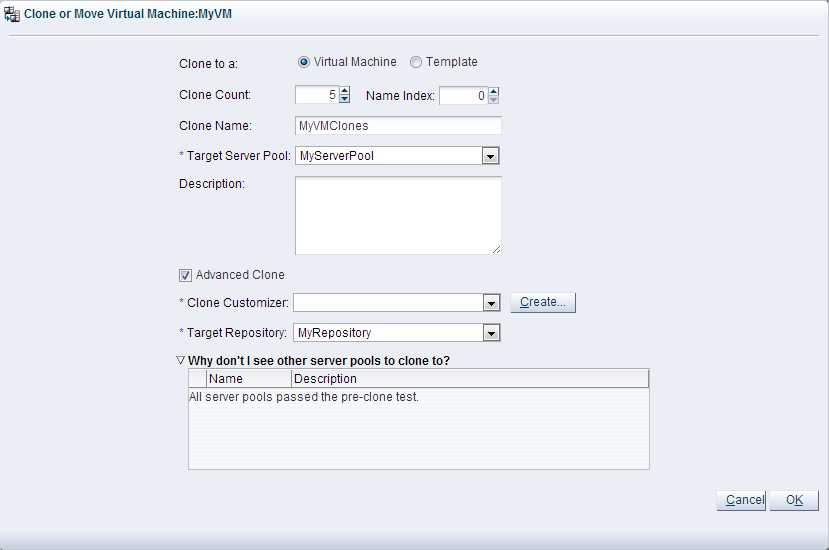
The Clone or Move (Virtual Machine or Template) dialog box is displayed.
Select or enter the following:
Clone to a: Select the clone type, either Virtual Machine or Template, to specify the objects to create from the clone.
Clone Count: The number of clones to create.
Name Index: The start index number to use for the clone name suffix. The default is
0. This is used in conjunction with the Clone Name field to create the name for each clone.Clone Name: An optional name for the virtual machines or templates. The maximum name length is 256 characters and may contain any character. The name need not be unique. If no value is given, the default is the name of the virtual machine or template being cloned. Each clone is suffixed with a dot (.) and the clone index number, starting with the value for the Name Index field. For example, if the Clone Name field is set to
MyVM, and the Name Index field is set to1, the resulting clones would be namedMyVM.1,MyVM.2and so on.Target Server Pool: The server pool on which the clone is to be deployed.
NoteThe list of server pools that are available in the drop-down is limited to valid server pools that are capable of handling the cloning process correctly. This helps you to prevent cloning to a server pool that may fail to process the request. If this list is empty, you should refer to the table presented under the Why don't I see other server pools to clone to? element in this dialog.
Description: A description for the virtual machines or templates.
Advanced Clone: Whether to use a clone customizer to set preferences for the clone operation.
Clone Customizer: The clone customizer to use to create the clones. This is used to set virtual disk mappings to enable you to copy disks to other storage locations. It also allows you to create network mappings so you can use new VNICs and other networks for the clone. Click Create... to create a new clone customizer. See Section 3.5.2.13, “Manage Clone Customizers” for information on creating a clone customizer. This field is enabled if Advanced Clone is checked.
Target Repository: The repository to store the cloned virtual machine configuration file. This does not affect any clone disk mappings you set using a clone customizer; this option is only for the virtual machine configuration file. This field is enabled if Advanced Clone is checked.
Why don't I see other server pools to clone to? A collapsed window element, providing a table of server pools that do not meet the requirements to accept a clone request. Expanding any of the entries in this table displays the reason that the server pool does not qualify.
TipIf you clone a virtual machine or template without using a clone customizer, the storage repository is locked for the duration of the cloning job; this may be some time in some circumstances. To quickly create clones and not lock the storage repository, use a clone customizer.
Click OK.
The virtual machines are created and deployed to the server pool. The templates are created in the storage repository.
It is important to understand that older templates may use a different device type to attach virtual disks. This may affect your ability to attach new virtual disks, such as a virtual CDROM device. There are some limitations on mixing virtual disks of differing device types on a virtual machine. See How are Virtual Disks Managed? in the Oracle VM Concepts Guide for more information about how device types are allocated to virtual disks and what you may need to do to solve any issues surrounding this problem.
To move a virtual machine between repositories:
Click the Servers and VMs tab.
Select the server pool on which the virtual machine resides in the navigation tree.
Select Virtual Machines from the Perspective drop-down list. Select the virtual machine in the management pane, and click Clone or Move
. The Clone or Move dialog box is displayed. Select Move this VM.
Select a clone customizer from the Clone Customizer drop-down list. If no clone customizers are displayed or you want to create a new one, click Create. See Create a Clone Customizer for information on creating a clone customizer.
Select a repository from the Target Repository drop-down list. This is the location of the new virtual machine configuration file.
Click Finish to move the virtual machine.