Configure Port-Paired Networks (Administrators)
This procedure describes how to configure quad-port 10 GbE NIC port pairs to specific network endpoints.
Note - Alternatively for SuperCluster version 3.0 (or later), you can control which network endpoints are assigned to I/O Domains by creating root domain groups (see Enable or Disable Root Domain Groups (Administrators)).
Each quad-port NIC provides four 10 GbE ports through a spitter cable. The ports are paired together, meaning that the first two ports are port pair 1, the second two ports are port pair 2.
Port pair 1 is usually used as the default client access network.
Port pair 2 is not enabled by default, but it can be added as an additional network resource, providing another interface to the same network, or be configured as a different network, providing network isolation.
For every quad-port NIC, two port pairs can be enabled by Oracle personnel. You can choose exactly which client access facility network each port pair connects to. Then, in the assistant, you configure the port pair's network endpoints so that you can assign the port pair network resources to I/O Domains.
After you configure the second port for use, port pair 2 is displayed as a selectable interface when you create I/O Domains.
Prerequisites
-
Port pairs can only be configured on SuperClusters that have the quad-port 10GbE NIC installed.
Note - SuperCluster M8 ships with this NIC by default. SuperCluster M7, by default, ships with the dual-port 10GbE NIC which does not support the port-pair feature. -
Oracle personnel must enable the port pairing feature on SuperCluster. This usually happens during the SuperCluster installation, but Oracle personnel can enable the feature later on qualifying SuperClusters with software v2.5 or later.
-
A physical connection must be made, connecting the port pair connectors to the appropriate facility network switch.
-
You must have the administrator role to perform this task.
 | Caution - Incorrect network parameters can result in problems that affect your network environment. |
- Access the SuperCluster Virtual Assistant.
- In the navigation panel, select Network Resources.
-
Check if the system is ready to configure port pairs.
If you see a table titled Network Endpoints, port pair configuration is enabled, and you can continue to configure port pairs. If you do not see this table, Oracle personnel have not enabled this feature. Contact your Oracle representative.

-
In the Network Endpoints Table, click Add.
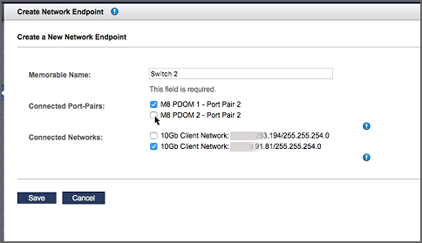
The Create Network Endpoint menu is displayed.

-
Define the parameters and click Add.
Note - Complete this menu for one connected network at a time. Select one or more port pairs for the one network. If you want to configure other networks to port pairs, repeat this procedure.-
Memorable Name – Assign a name for this network configuration. The name is later displayed as a network resource that can be assigned to I/O Domains. Specify a name that identifies the network to which the port pairs will be associated.
-
Connected Port-Pairs – Select the port pairs that you want associated with a given 10 GbE network endpoint. You can select one or more port pairs.
-
Connected Networks – Select the network you want associated with the port pairs. Only select one network.
-
-
Click Save.
The port pairs and associated network endpoints are displayed in the Network Resources → Network Endpoints table.
The new port pair network resource is available to be assigned to I/O Domains.

- If you want to assign other port pairs to a network endpoint, repeat Step 4 through Step 6.
-
Consider your next action.
-
Create and deploy I/O Domains – See Creating and Deploying I/O Domains.
-
Add a VLAN tag – See Add VLAN Tags (Administrators).
-
Go to the Administrative Task Overview – See Administrative Task Overview.
-