Set Up Networks
After the assistant is initialized (see Initialize the Assistant) you add additional networks that are used by domains. In some cases, your Oracle representative performed this task during the initial configuration of SuperCluster.
You can use IP addresses that fall within the range of the preconfigured addressees as long as they do not overlap with addresses that are already allocated. For the minimum required IP addresses for each domain, see Minimum Number of IP and Alt MAC Addresses.
After this task is complete, you can edit network parameters or additional network addresses. See Add or Edit a Network (Administrators).
 | Caution - Incorrect network parameters can result in problems that negatively affect your network environment. You might need to consult with your network administrator to obtain IP address information. |
-
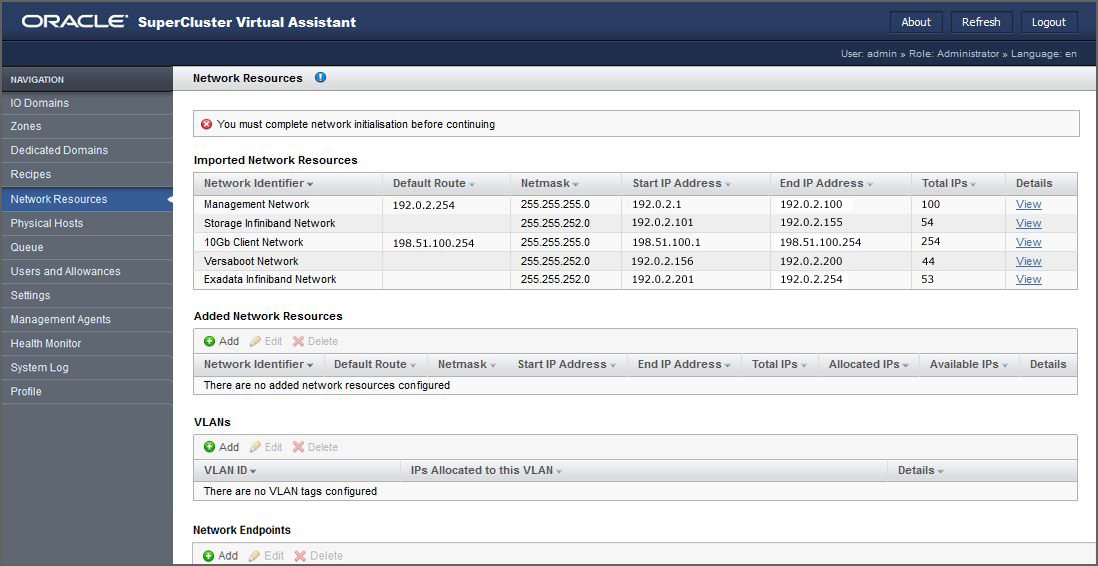
In the Network Resources screen, review the network parameters assigned to
each network.
The networks in the top table are the SuperCluster networks that were created when SuperCluster was installed. You cannot modify these network parameters.
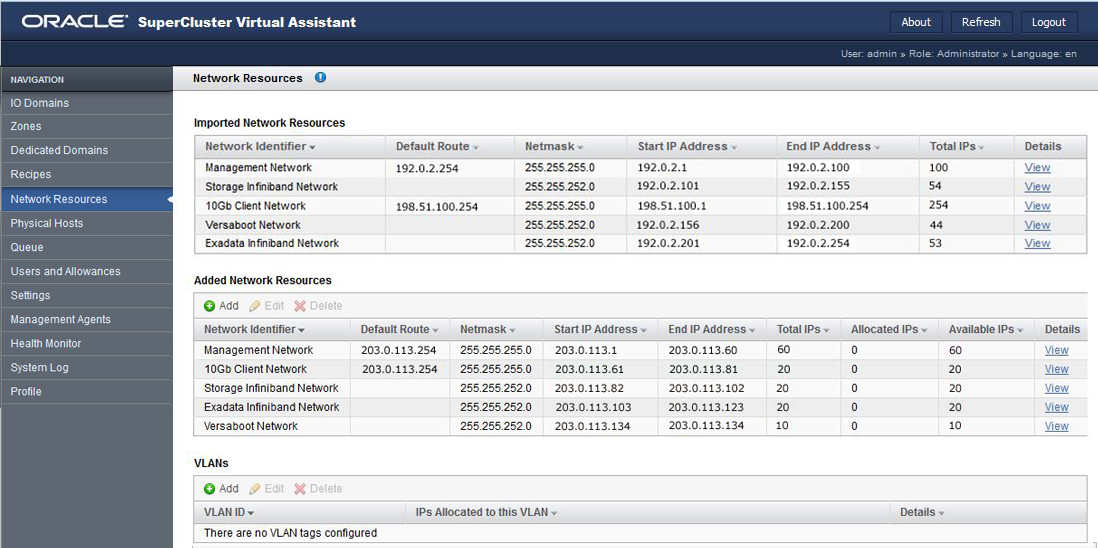
The networks in the bottom table are additional networks that you add with the assistant, and are used by domains.

SuperCluster supports these network types:
-
Management network (for ease of network administration, configure all management networks on the same subnet.)
-
10Gb client network.
-
Storage IB network.
-
Exadata IB network.
-
Versaboot network (supports iSCSI devices using IPoIB on systems such as SuperCluster M7). Each domain requires one Versaboot IP address.
-
Standalone Exadata client network (on some SuperClusters).
You must create additional IP ranges for each network type. The additional networks you create provide the network resources to domains.
You can add multiple networks of the same type. For example, you can add multiple management networks, each with its own set of network parameters.
-
-
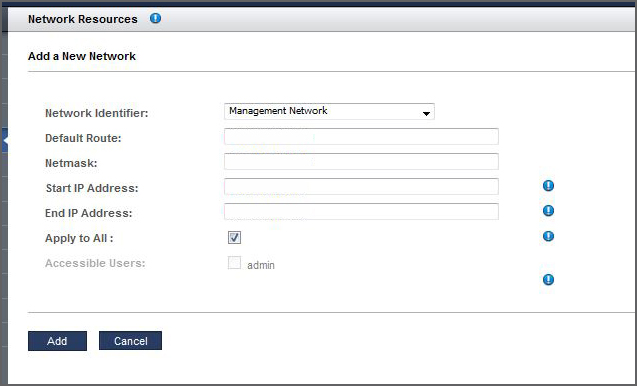
Under Added Network Resources, click Add.

-
Define the parameters.
-
Network Identifier – Choose a network type.
-
Default Route – Type the default route for this network. This parameter is not applicable to Storage IB, Exadata IB, or Versaboot network types.
-
Netmask – Choose the netmask for this network.
-
Start IP Address – Type the starting IP address.
-
End IP Address – (Optional) Type the ending IP address. If you leave this blank, a full compliment of IP addresses are configured for this network.
-
Apply to All – (Optional) Select the Apply to All check box if you want to associate all current and future SuperCluster users with this network. If you want to associate specific users or groups with this network, do not select the Apply to All check box. Instead, select the specific user names.
-
- Click Add.
-
Repeat Step 2
through Step 4
until you have added IP addresses to all of the networks.
For example:

- To view all the IP addresses for a network, click View under Details.
- To confirm that resources are available, select Physical Hosts in the navigation panel.
-
Consider your next action.
-
Assign Fibre Channel addresses (Mandatory for some SuperClusters with Fibre Channel interfaces) – See Assign Fibre Channel Addresses.
-
Add VLAN tags – See Add VLAN Tags (Administrators).
-
Configure security settings – See Configure Security Settings (Administrators).
-
Go to the Administration Task Overview – See Administrative Task Overview.
-
Log out of the SuperCluster Virtual Assistant – See Log Out of the SuperCluster Virtual Assistant.
-