Create an Application I/O Domain
You can use a recipe to assign the amount of resources to the Application Domain, or you can define the resources on the fly. If you plan to use a recipe, it must exist before you perform this procedure. See Choose an I/O Domain Creation Method.
You can use a network recipe to assign the network resources to the domain, or you can define the resources on the fly. If you plan to use a recipe, it must exist before you perform this procedure. See Choose an I/O Domain Creation Method. If you plan to assign VLAN tags to the domain, they must exist in Network Resources before you perform this procedure. See Add VLAN Tags (Administrators).
For Oracle Solaris Cluster configurations, create domains with the solaris-large-server OS consolidation. Either use the Application Large default recipe, or upgrade the domain with pkg install solaris-large-server after the domain is deployed,
Creating an Application Domain reserves the specified amount of resources for the domain. The domain is not installed and available until you deploy it. See Deploy an I/O Domain.
The assistant does not allow you to assign more resources than are available.
Note - (Only applies to SuperCluster version 2.6 or earlier) If you plan to change CPU and memory allocations for dedicated domains with the osc-setcoremem tool, do so before you configure any domains. Refer to the Administration Guide for your SuperCluster model (for example, Configuring CPU and Memory Resources (osc-setcoremem) in Oracle SuperCluster M8 and SuperCluster M7 Administration Guide).
This note does not apply to SuperCluster 3.0 (or later).
- Access the SuperCluster Virtual Assistant.
- In the navigation panel, select I/O Domains.
- Click Add.
-
Define these parameters to create an Application Domain.
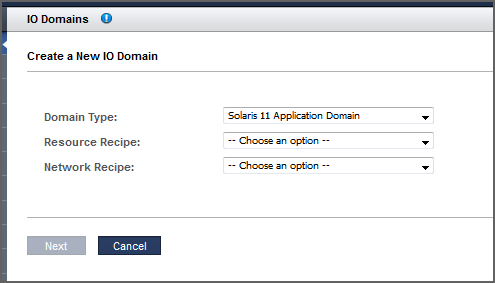
-
Domain Type – Select Solaris 11 Application Domain.
-
Resource Recipe – Select one of these options:
-
A Small, Medium, Large, or any other recipe – See Managing Recipes and Templates.
-
Custom Resource Recipe – Enter resource allocations for cores, memory, and 10GbE interfaces. See Step 5. Note – If you want to assign a 10GbE NIC port pair to the I/O Domain, you must use this method. For information about port pairs, see Configure Port-Paired Networks (Administrators).
-
-
Network Recipe – Select one of these options:
-
One of the network recipes – See Create a Network Recipe.
-
Custom Recipe – Enter the network parameters.
-
-
-
If you selected Custom Recipe, define the amount of these resources, then
click Next.
-
Number of Cores – Choose a minimum of one core for an Application Domain.
-
Memory – Choose a minimum of 16 GB Memory for an Application Domain.
-
Number of 10GbE Interfaces – Choose up to two 10GbE interfaces for an Application Domain.
-
Number of FC ports – Choose up to two assignable fibre channel ports for an Application Domain.
-
-
If you selected Custom Recipe for the network, define these resources and
click Next.
-
Domain Name – Type the domain name, such as example.com, for this Application Domain.
-
Name Servers – Provide a list of comma or space-separated IP addresses of name servers for this Application Domain.
-
Time Servers – Provide a list of comma or space-separated IP addresses of time servers for this Application Domain.
-
Time Zone – Choose a time zone for this Application Domain.
-
-
Review the resources and click Next.
Note - If you requested more resources than are available, the assistant highlights the resources that are not available.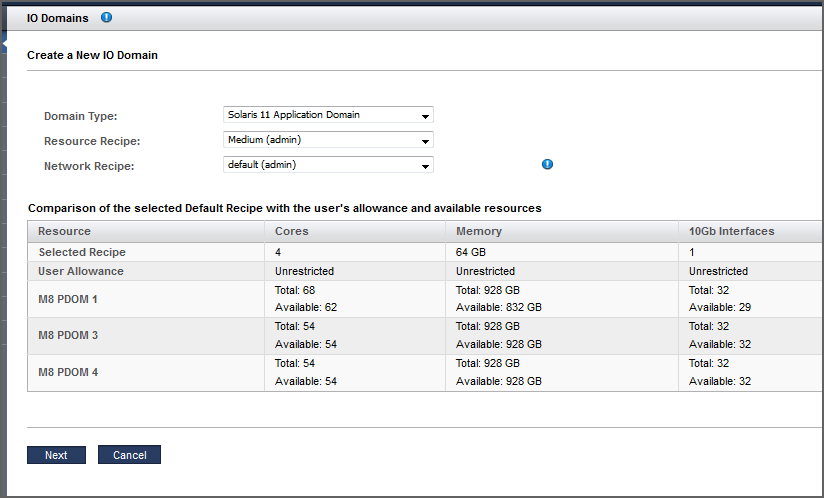
-
Provide additional configuration information.
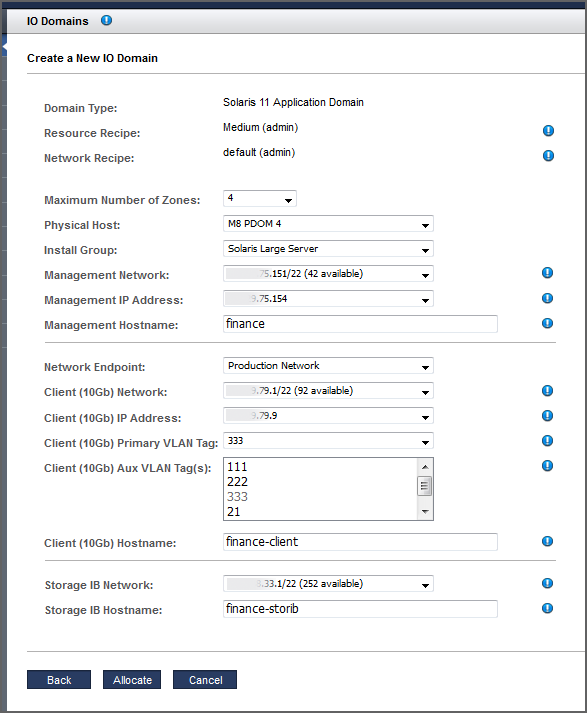
Configure these parameters:
-
Maximum Number of Zones – (as of SuperCluster 3.0) From the drop-down list, choose the maximum number of zones that can be created in this I/O Domain. The maximum number that you are able to select is two times the number of cores.
-
Physical Host – The compute node where the Application Domain will reside.
-
Install Group – Depending on your configuration, choose one of these options:
-
Solaris Minimal Server – Installs the minimum set of packages that are required to boot the OS, log in, and manually add additional packages as required.
-
Solaris Large Server – Installs all of the common network services and drivers that an enterprise server typically provides.
-
-
Management Network – You can select the Management Network from which to assign an IP Address. All Management Networks defined in the Added Network Resources table of the Network Resources page with sufficient free IP Addresses can be selected. If the Resource Recipe for the I/O Domain that you are configuring contains two Management Interfaces, you will see two sets of inputs in order to provide two entries for the Management Network, IP Address, VLAN Tag, and Hostname. In this case, two Management interfaces will be configured in the I/O Domain after it has been deployed. If the I/O Domain has two Management Interfaces, then each of those Management Interfaces can use any Management Network with sufficient available IP Addresses.
-
Management Hostname – Enter a unique name for this Application Domain.
-
Network Endpoint – This option is only displayed when port pairs are configured (see Configure Port-Paired Networks (Administrators)).
If port pairs are configured, select the network endpoint that you want the I/O Domain to use.

-
Client (10Gb) Network – You can select the Client Network from which to assign an IP Address. All Client Networks defined in the Added Network Resources table of the Network Resources page with sufficient free IP Addresses can be selected. If the Resource Recipe for the I/O Domain that you are configuring contains two Client (10Gb) Interfaces, you will see two sets of inputs in order to provide two entries for the Client Network, IP Address, VLAN Tag, and Hostname. In this case, two Client (10Gb) interfaces will be configured in the I/O Domain after it has been deployed. If an I/O Domain has two Client Interfaces, then each of those Client Interfaces can use any Client Network with sufficient available IP Addresses.
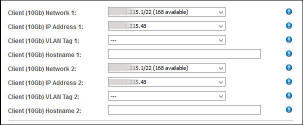
-
Client (10Gb) IP Address – Displayed only if the IP Address assignment is set to manual. See Configure How IP Addresses are Assigned (Administrators). When this setting is enabled, you see a drop-down list of IP Addresses from the selected Client (10Gb) Network and you can select the desired IP Address.
-
Client (10Gb) Primary VLAN Tag – If VLAN tags were added to the Network Resources (see Add VLAN Tags (Administrators)) you can select a VLAN tag from the drop-down list to assign to this I/O Domain. This field is always displayed on the I/O Domain configuration page, even if you did not define any VLAN tags in the Network Resources section. The default is no VLAN tag, which is indicated by ---. VLAN tags are only configured on the 10 GbE client network. Primary VLAN tags are applied to the network interface and to the VF.
-
Client (10Gb) Aux VLAN Tag – As of SuperCluster version 3.0, if VLAN tags were added to the Network Resources (see Add VLAN Tags (Administrators)) you can select one or more VLAN tags from the auxiliary list, otherwise the list is empty. auxiliary VLAN tags only apply to VFs. A typical use of auxiliary VLAN tags is to assign them to zones that are later created in the I/O Domain.
-
Client (10Gb) Hostname – Use the default, or type a unique name for the client network for this Application Domain.
-
Storage IB Network – Depending how the assistant is configured, the IP address might be automatically assigned or you might be able to choose an available IP address for the ZFS Storage Network. See Configure How IP Addresses are Assigned (Administrators).
-
Storage IB Hostname – Use the default, or type a unique name for the ZFS Storage Hostname for this Application Domain.
-
-
Click Allocate to create the Application Domain.
The SuperCluster Virtual Assistant reserves the system resources but does not deploy the configuration. You can deploy the Application Domain at your convenience. See Deploy an I/O Domain.
Note - Resources are only reserved for 120 hours (five days). If the domain is not deployed within that time frame, the resources are returned to the free pool.If the assistant detects a configuration issue, the assistant displays a message:
-
Insufficient resources. For example:
Insufficient Unallocated Cores available on the chosen Compute Node. 10 Requested,
8 Remaining
-
Configurations that might have performance issues. For example:
Error: VF allocation requires dedicated core in the same locality group for
performance reasons.
requested core count: 1  optimal core count based on number of requested VFs: 2
If you receive one of these messages, click Cancel and configure a new domain using a recipe that requests fewer or different resources.
-
-
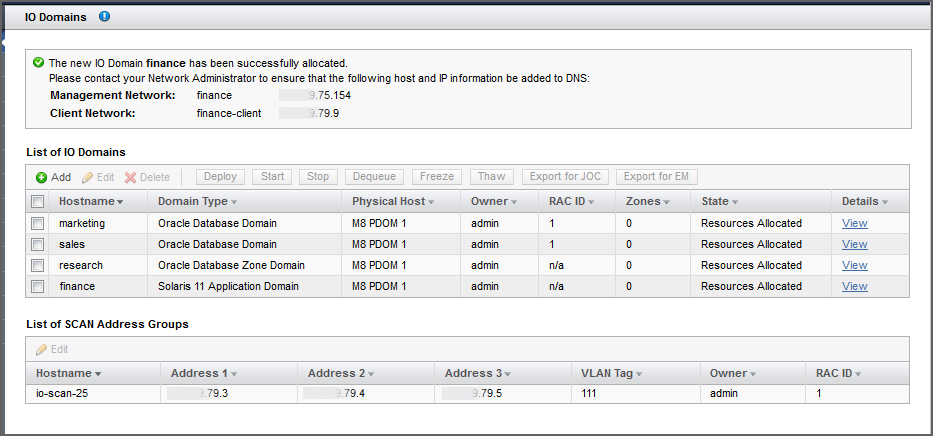
Verify that the Application Domain allocation completed.
A confirmation panel is displayed at the top of the I/O Domains screen. The State column displays the status of the allocation.
-
Add the management and client networks to DNS.
The network host names and IP addresses are displayed in the confirmation panel in the I/O Domains screen, and are available when you view the domain's details.
-
Consider your next action.
-
Deploy the Domain – See Deploy an I/O Domain.
-
Go to the Domain Configuration Task Overview – See Domain Configuration Task Overview.
-
Monitor activity – See Monitoring Activity, Resource Alterations, and Health.
-