A project workflow contains a preset list of tasks, each of which can be assigned to a user. The tasks represent activities you perform in ATG Merchandising. For example, the first task in an ATG Merchandising project is Author, which permits you to access ATG Merchandising and edit commerce assets.
The options that appear in ATG Merchandising depend on the task and type of project. By default, the Author task provides unrestricted access to all functions in ATG Merchandising. The Review Content task and the deployment-related tasks, however, allow users to view assets but not to modify them.
This topic includes the following procedures:
Assigning a Task
You can assign a project’s current task to a specific ATG Merchandising user. After the task is assigned, the project appears in the assigned user’s “Projects with My Tasks” To Do list on the ATG Business Control Center home page, where they can work on it before advancing to the next task or assigning it to another user. Only the assigned user is permitted to work on that task in the project.
To assign a task to a user:
On the ATG Business Control Center home page, locate the project you want to work with in the To Do List. Use the Show menu to filter the list and help you locate the project.
To create a project, see Creating an ATG Merchandising Project.
Click the project name.
The current task and the user assigned to the task display below the project. If the task has not been assigned, “Unassigned” appears, as shown in the following figure.
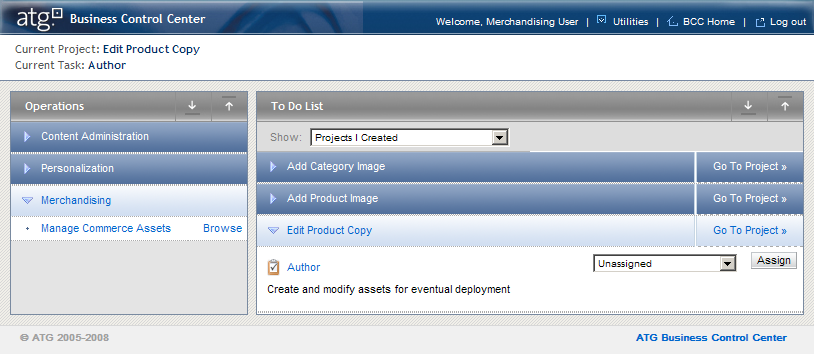
In the dropdown list, select the name of the user you want to assign the task to.
If you plan to work on the task, assign it to yourself by selecting your username from the list.
Click Assign.
Opening a Project
You work on a task by opening the project from the ATG Business Control Center home page. ATG Merchandising opens to the main page where you can perform actions related to the current task.
To open an ATG Merchandising project:
On the ATG Business Control Center home page, locate the project you want to work with in the To Do List. Use the Show menu to filter the list and help you locate the project.
To create a project, see Creating an ATG Merchandising Project.
If it is not already assigned to you, assign the current task to yourself. See Assigning a Task.
Click the project name.
The current task in the workflow and the user assigned to that task display below the project name.
Click the name of the current task, for example, Author.
ATG Merchandising opens to the main page with the Browse tab Catalog view displayed. See Main Page. To return to the ATG Business Control Center home page, click the BCC home link at the top of the page.
Adding Assets to a Project
When you make changes to an asset, a new version of that asset is automatically added to your project and appears in the Project tab. If you plan to modify an asset but have not yet done so, you can add it to the project manually, as follows:
Using the Browse tab or the Search tab, locate the asset. See Browse Tab or Searching for Assets in the Search Tab.
Click the checkbox beside each asset you want to add.
Click Add to Project.
Note: When you deploy a project, all of the assets listed on the Project tab are updated on the target site.
For more information, see Project Tab.
Reverting Changes to Assets
If you want to undo changes you made to an asset in your project, you do so by removing the asset from the project. When you remove an asset, it reverts to the state it was in before you added it to your project.
Depending on the change you made to the asset, removing it from the project does one of the following:
Permanently deletes an asset you created in the project
Undoes all changes you made to an existing asset
Restores an asset that you deleted in the project
To revert changes to assets and remove them from a project:
Click the Project tab.
Select the checkbox next to each asset that has changes you want to undo.
Click Remove.
